How To Filter IP Traffic In Google Analytics
For More Accurate Reports
WHAT COURSE ARE YOU LOOKING FOR?
-

How To Filter Internal Traffic in GA4
1 Mar 2024Original Article April 2018. Updated for GA4 in March 2024.
Discovering how visitors engage with your website is invaluable. However, the effectiveness of your GA4 data hinges on its accuracy. Ensuring that you're tracking genuine visitors rather than internal staff or remote workers is paramount. Follow this step by step guide to setting up IP Filters in GA4
Understanding and analysing website traffic patterns in GA4 is crucial for optimising performance and making informed decisions.
However, internal staff and remote workers, using the website for information can skew the data in the GA4 reports, giving increased traffic and incorrect engagement metrics, potentially leading to wrong decisions being made about your marketing and website useage.
Filtering traffic using specific IP addresses will provide you with a cleaner view of actual visitor activity, by excluding irrelevant or internal traffic noise.
You should remove website traffic from your offices, your designers, developers, freelancers and other agencies.
You should also consider filtering out IP address from home workers - particularly if they have static IPs.
Don't know how to filtering out these IP addresses? Read on...
How to Filter Traffic from Specific IP Addresses
In Universal Analytics setting up these IP filters was a “simple” 1 step process, in GA4 it is split into 2 sections, although both are straight forward to do:
- Adding the IP address to the Filter
- Activating the Filter
We'll start by setting up the IP address on the filter.
STEP 1
Go to Admin > Data Streams
Select Data Stream

STEP 2
Find and click “Configure Tag Settings”, this can be found under the Google Tag section (you may have to scroll)

Step 3
Next find and click “Define internal traffic”, you may have to click “Show More”


Step 4
To enter a new address to filter, click “Create”

Complete the fields

1. Rule Name - Give it a name that you will find useful and easy to understand what is being filtered. E.g. Manchester Office.
2. Traffic Type is defined as “Internal” as default, and in most case this is fine to use as a catch all.
You can enter your own custom name (can’t include space or special characters) to allow for better categorisation or increased flexibility and control on which filters are active (we’ll get to this part in a bit).
3. Match Type - If entering a single IP address to filter select “IP Address equals” from the dropdown, again if you are blocking a multiple or a range of IP addresses from the same location etc, you may want to use one of the other options. If you are filterering a few IPs, it is best to use 'IP Address equals' and add additional conditions for each IP.
4. Value – Enter your IP address. If you’re not sure what this is, click “What’s My IP Address?” link on the right hand side. However, if you’re working in an office you could ask our IT department for a list of IPs.
5. Click “Create”
You’ve created, or added, an IP Address to your Data Filter and should be able to see it listed under Internal Filter Traffic.
Now you need to make sure that the filter is active.
Activating Internal Traffic Filter
Step 1
From the Admin Menu:
Find and Click on “Data filters” either in the left hand menu or on the main centre menu under “Data Collection and modification”

Step 2
By default there will be 2 two filters available, “Developer Traffic” and “Internal Traffic”.
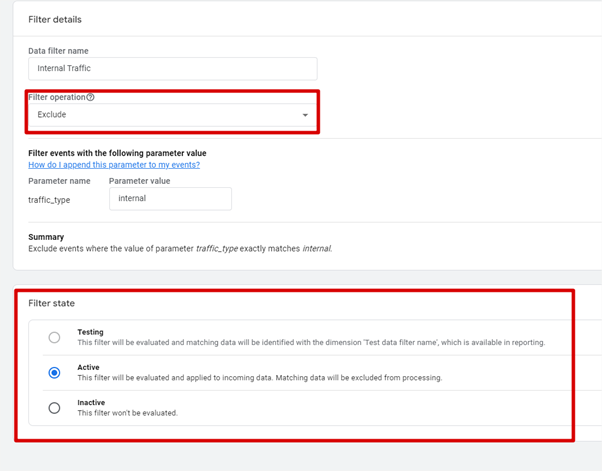
You want to make sure that “Internal Traffic” Operation is set to Exclude and Current State is “Active.

Step 3
If this is not the case then click “Internal Traffic”
Find “Filter operation” and choose “Exclude” from the dropdown and then under “Filter state” select the “Active” button

Step 4
Click save in the top right hand corner.
And that’s it, you’re done. The filter is now set up and active.
Remember, this will only affect reports going forward from this. It will not filter out internal traffic from past reports.
Note: Home workers may have Dynamic IPs
Your home workers may have dynamic IP addresses, which means their IP address may change regularly.
Even though an IP address is “dynamic” people tend to think that this means your Internet Service Provider (ISP) is constantly issuing a new IP address every time you go on line. This was the case when we were on dial up systems that required a unique connection between the ISP and modem, but this has not been true for a long time.
These days ISPs don't change the IP addresses that often (but this does depend on your provider). So you should try and filter out home workers that regularly visit your website for information or to edit the content.It is worth spending a few moments to find out if they have a Dynamic IP and if so get them to check it every few months or so to see if it has changed.
To determine if a PC's IP is static or dynamic follow these steps.
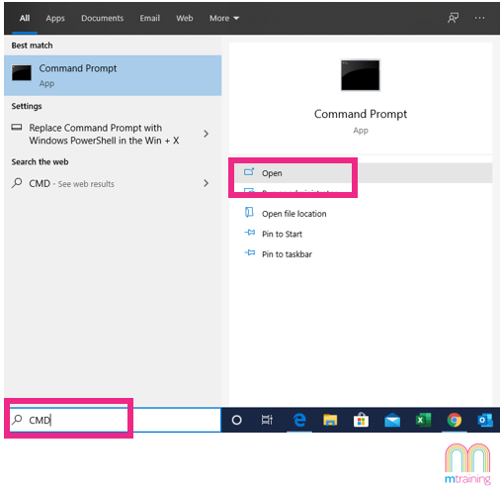
Open the Command Prompt by searching CMD from the search box in your Task bar.

Type ipconfig /all. Then look for the Ethernet connection listing. Find the IP Address line and this will give you your currently assigned IP address. Next, look at the DHCP Enabled line in the same section. If DHCP Enabled is set to 'Yes', you have a Dynamic IP Address. If DHCP Enabled is set to 'No', you have a Static IP Address.
Next look for the Wireless connection listing.

The example above shows Yes for both, so on this PC the user has a Dynamic IP.
If your key website editors have Dynamic IPs you could ask them to check it every few days to see how often it changes. If it changes frequently you may have to accept that you can't filter this user out but most of the time this isn't the case.
Want to learn more about Google Analytics? Take a look at our 1 day Google Analytics courses in Manchester, Liverpool & Leeds and Online.
Related Articles
-

Facebook vs. Google Analytics
05 Apr 2023Find out why Facebook report more clicks and conversions than Google Analytics?
Read More -

Google Analytics 4 Set-Up Checklist
19 Jan 2023Want to know the steps to take to set up Google Analytics 4 correctly? Read this blog...
Read More -

What is Google Analytics? And how can it help my business?
23 Jan 2023Find out about Google Analytics and how it can help your business.
Read More


