


How To Create a GA4 Property
Your Guide to setting up Google Analytics
-

How To Create a GA4 Property
7 Sep 2022Setting up Google Analytics 4 (GA4) can seem daunting and confusing, but at its basic level, it is very simple. In this article, we will take you through the steps to take to get your GA4 property up and running.
By now you are probably aware that in July 2023 the current version of Google Analytics (Universal Analytics) will stop collecting data. If you are using GA3 then you will have noticed the banner appearing at the top every time you open Analytics encouraging you to set up GA4.
It’s important to understand that when you set up GA4, it does not transfer across any data from Universal Analytics, it will only start collecting data from the moment you set it up.
So, with that in mind, it is a good idea to set up GA4 as soon as possible, even if you’re not going to use it as your main reporting platform just yet. It can run alongside Universal Analytics collecting data so when that fateful day comes (1st July 2023) and the data stop getting collected in GA3, you’ll at least have a good amount of data already in your GA4 property. It also gives you a good opportunity to get used to the interface as the are differences between GA3 and GA4.
So let's go through the basic steps of setting up your Google Analytics 4 property.
A guide to creating your GA4 property
There are 2 main ways to create your GA4 property if you already have Universal Analytics running. Each one has its own benefits and drawbacks depending on your depth of technical / Analytics knowledge and ability.
The 2 Ways are:
- - Using the built-in GA4 Set Up Assistant
- - Creating a New GA4 Property and implementing the tracking code on your website
No matter which method you use you end up with the same result. We will go through both of these methods, first starting with the Set Up Assistant method. If you are not using the Set Up Assistant skip over this section.
Using the GA4 Set Up Assistant
The GA4 Set Up Assistant makes it really easy for you to quickly set up a GA4 property and start collecting data alongside your Universal Analytics Property, it will attempt to transfer your basic settings from Universal Analytics.
This approach is probably best for people with limited Analytics knowledge, not a “techy” person or if you have a simple set-up currently with Universal Analytics, i.e. you just look at the standard reports.
You will have to have Administrator level access to use this method though.
Step 1.
So, to use the set-up assistant first we will need to open up Universal Analytics, in the property you want to create a GA4 version of.
Step 2.
Go to “Admin” in the bottom left-hand corner of the screen
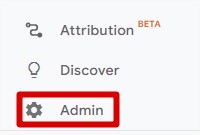
Then navigate to the Property section of the menu that appears (this is usually the middle column). You will see at the top of the column “GA4 property Set Up Assistant”. Click it.
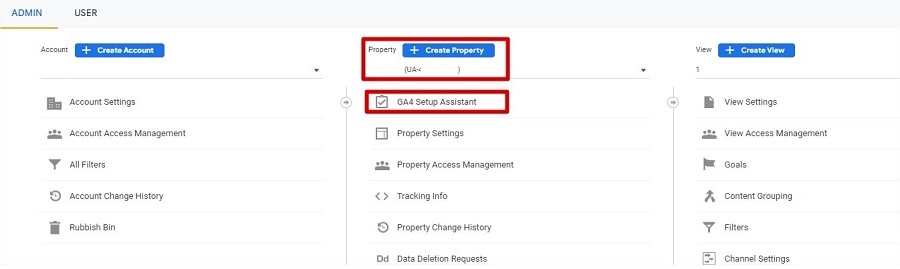
Step 3.
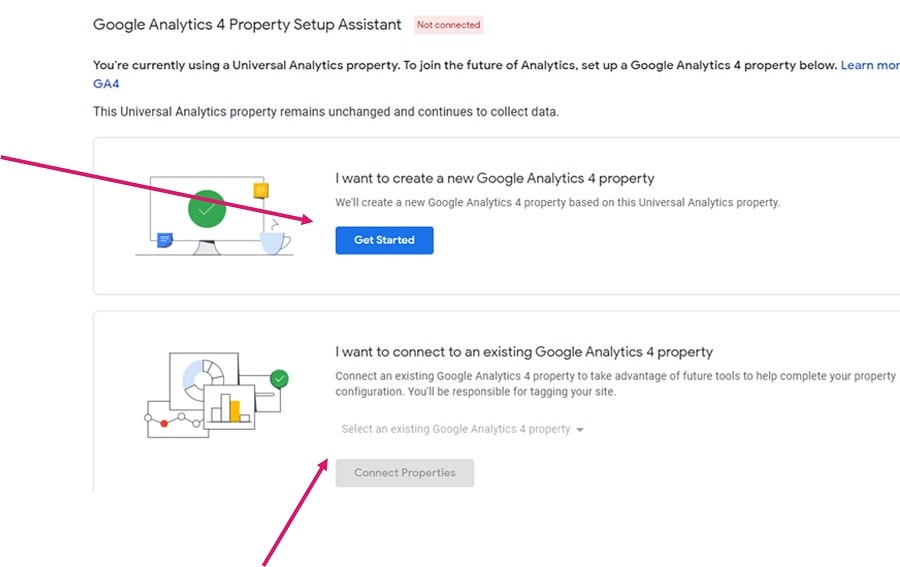
You’ll be presented with two options, “I want to create a new Google Analytics 4 Property” and “I Want to connect to an existing Google Analytics 4 Property”. Most likely, as you’re reading this guide, it will the former option you want to choose. Click “Get Started”.
Step 4.
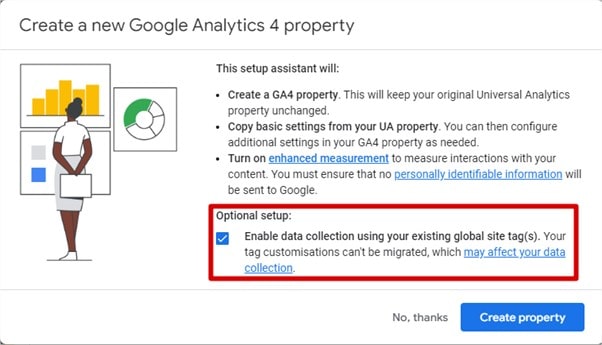
If you are using the latest version of the Google Analytics Tracking Code (GATC), gtag.js, then the “Optional Setup” box should be automatically checked.
Leave this checked and continued with the set-up.
Note: If you do not have the latest version, you won’t be able to check it, however, you can still continue with the set-up, but you will be required to replace the GATC code on you website after set up in order to start tracking data.
Step 5.
Setup Complete! If you have the latest version of the gtag, then your GA4 property will start collecting data* but you’ll need to wait until the following day to see this in the reports. There are a few other steps to consider, skip over the next section to see some helpful tips.
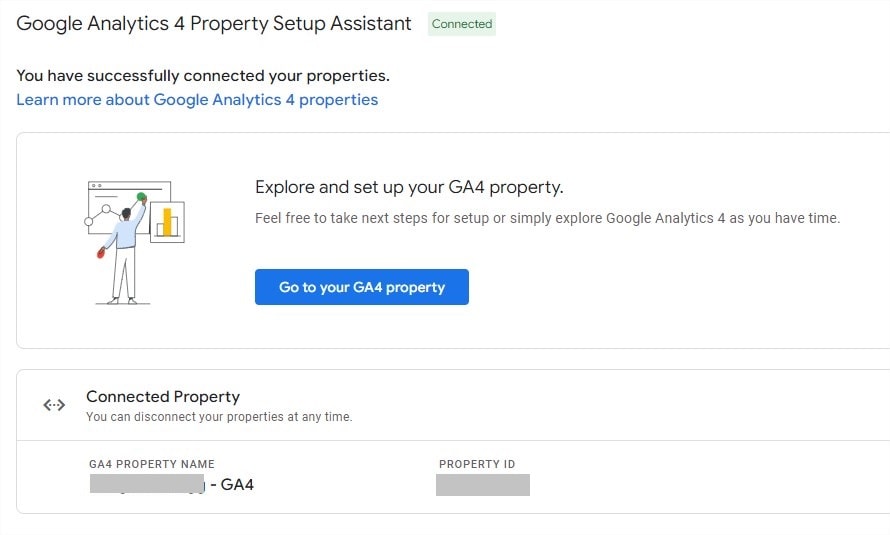
*If you used the Set Up assistant but didn’t have the latest version of the tracking code, you will need to add this code to your site before any data is collected. Jump to Step 5 of the next section.
Setting Up A New GA4 Property
Choose this option if you want to set up a new property (website), if you want to or if you need to start afresh. You will need to implement the new GA4 code on your website via either the CMS, hardcoding or using GTM (Google Tag Manager)
Step 1.
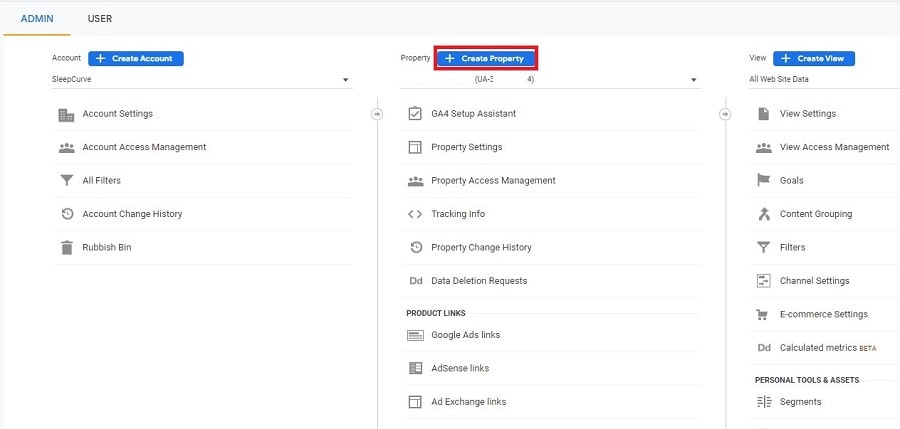
In your Google Analytics account, go to Admin and navigate to “New property” in the “Property” section of the menu (usually the middle column).
Step 2.
Complete your property name, currency ad time zone, click next.
Note: If you want to set up a Universal Analytics property as well as a GA4 property for this website you can do so by selecting Advanced Options

Step 3.
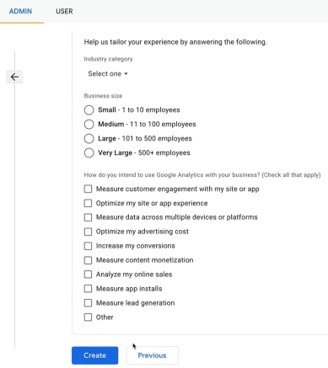
Give Google a bit more information about how you are using GA4 and then click create.
Step 4.
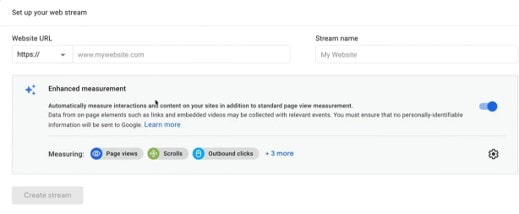
Your property is now set up, but we need to continue to set up our tracking. In this example, we’re going to choose Web.
And then enter our details for our Data Stream, which in this scenario will be a website. You can leave “Enhanced Measurement” with the slider switched on (if it’s not already switched on, switch it on). Click “Create Stream”.
If you want to edit this at any point in the future, we can always come back to Admin>Data Stream.
Step 5.
Next, you need to grab your tracking code to add to your website so that you can start collecting data.
There are a number of possible ways of doing this. Depending on how your website is built or managed and your level of skill..
Plugins / Website builders / Google Tag Manager
If your website is built on one of the many website builders out there such as Shopify, 1&1 etc or it is built in WordPress, then it is likely that you will already have a section within the CMS where you can enter the details of your Google Analytics tracking code (in WordPress this may be a separate plugin)
With these, you will probably just need to grab the Measurement ID from your property and paste it into the tool.
If you are using Google Tag Manager to add the code to your site, you can use the Google Analytics: GA4 Configuration tag. Again, with this method, we just need to copy and paste the “Measurement ID”.
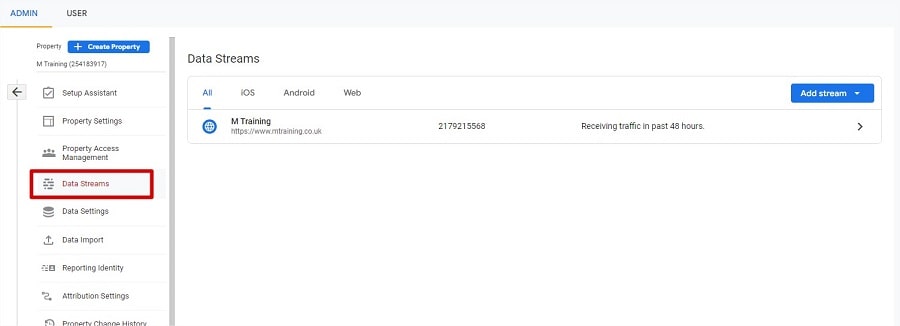
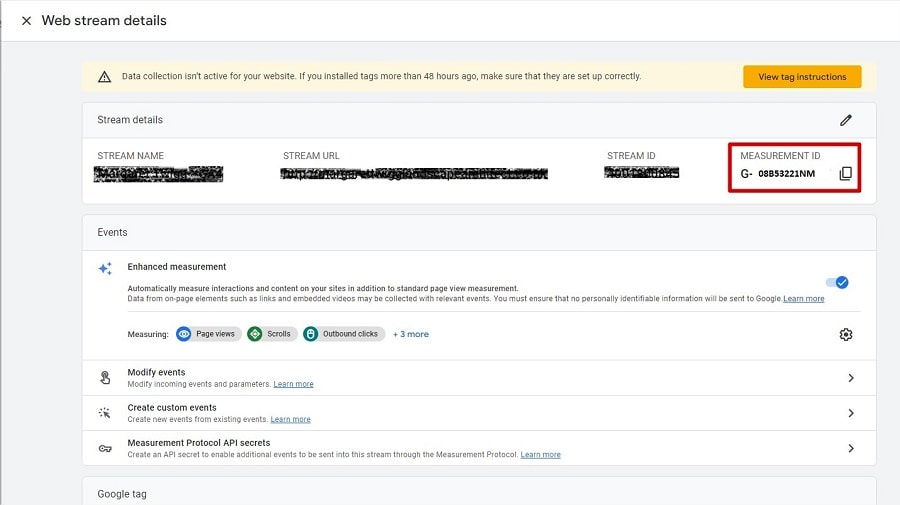
To grab the “Measurement ID” go to Admin>Data Streams, then click on the property name you have just set up.
Find the “Measurement ID” in the top right-hand corner and click the two offset boxes next to it to copy it to your clipboard. Once done, go to your chosen website builder/plugin/GTM etc and paste it into the appropriate section.
Once you have completed the steps necessary on your website side, GA4 should be up and running.
Hardcode method
If you don’t have access to your CMS, or your site doesn’t have a CMS then you will need to add the code directly into the sites HTML ( you can do it yourself or get a developer to do this), initially you’ll need to grab the full GTAG code. (Some CMS systems will require the full GTAG code rather than the Measurement ID)
To do this go to Admin>Data Streams select the property we have just set up and go to the bottom of the page to find “View Tag Instructions”.
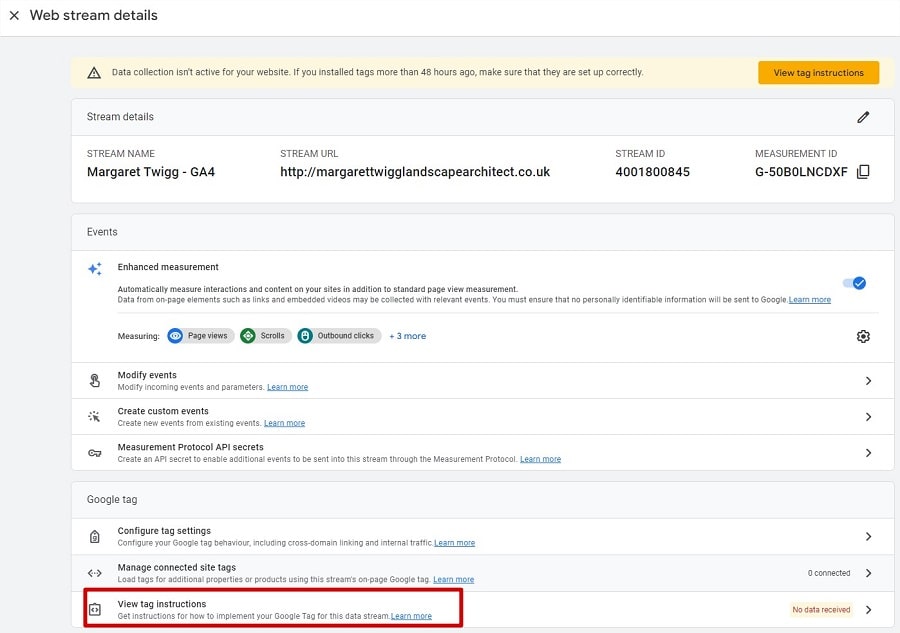
Select “Insert Manually” to find the code. Click the two offset boxes to copy this to your clipboard and this can then be dropped into the HTML/CMS of your website as per the instructions given by Google.

Optional Step 6.
Once you have the code on your website via any of the above methods you will start tracking data (you will need to wait until the following day to start seeing this data in your reports), but at this stage we are only tracking data in GA4.
If you want to continue tracking data in Universal Analytics also, we need to take another step.
First, you’ll need to grab the Tracking ID from Universal Analytics.
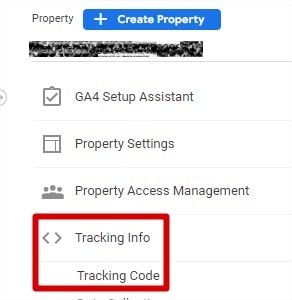
To do this open your Universal Analytics property (best to do this in a separate tab so you can keep GA4 open) go to Admin>Tracking Info> Tracking Code and copy the Tracking ID

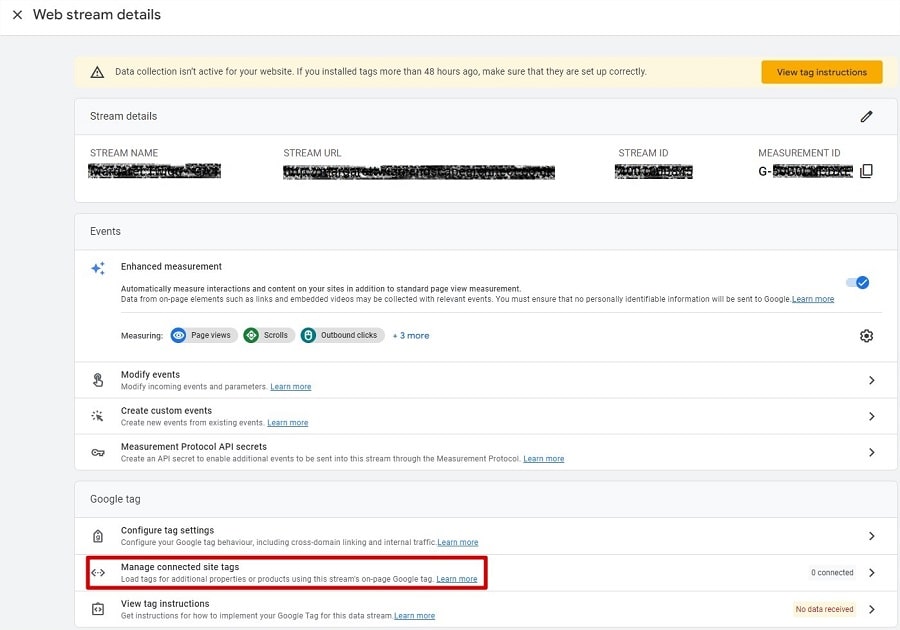
Switch back to GA4 and go to Admin>Data Streams and then click into your website stream as with the previous steps. Then find “Manage Connected Site Tags”.
Here is where you paste in the Tracking ID of your Universal Analytics property and then give it a name so that in the future you will understand what is connected.
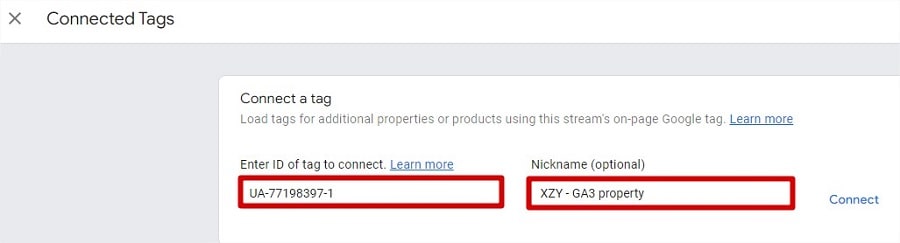
Click Connect.
Set Up Complete!
Done. That’s it. The basic set-up is complete and your GA4 property will be tracking data alongside your Universal Property so now you can get to grips with GA4 interface whilst using the familiar reports in GA3.
But there are a few other things you should be aware of in your set-up that you may or may not want to get sorted read on below.
Hints & Tips
Data Retention – By default GA4 only retains some data for 2 months. This can be extended up to 14 months. Make sure you make this change so you can keep more of your lovely data. Go to Admin > Data Settings >Data Retention and choose 14 months from the dropdown and Save.
IP Filters – If you do not want to track certain traffic in Analytics, such as internal traffic from your office. We will want to exclude these IP addresses by going to Admin> Data Streams > Website name > Configure tag Settings > Define Internal Traffic (you may need to click “Show All”).
Once you have entered the IP addresses you want to block here you need to go to Admin> Data Settings > Data Filters > Internal Traffic and switch to “active”.
Events & Conversions (Goals in Universal Analytics) – If you previously had Goals set up in Universal Analytics these will need to be set up again in GA4. This requires creating Events and marking them as Conversions.
To do this go to Configure>Events>Create Event
Linking Google Ads / Search Console/ Merchant Centre If these were connected to Universal Analytics, you’ll need to connect them again to GA4. Do this by going to Admin > Product Links
Google Signals – Google Signals allows Google Analytics to track more data about users to your website/app and allows it to better track cross-device users and provide more detailed user insights. To enable this feature, go to Admin> Data Settings > Data Collection
Summary
And there you have it, you are all set up and raring to go,
Whilst the idea of setting up GA4 may seem daunting, the basics can actually be done in around 30 minutes.
Taking the time to set it up now will ensure that you start collecting data, so when the inevitable day comes and GA3 stops collecting data, you will have a good amount in GA4 saved up and hopefully you’ll be more comfortable navigating around the new interface.
There are lots of good reasons to start using GA4 now. Not only does it provide more accurate data, but it also collects more data giving you more valuable insights into your visitors, your website and your campaigns.
If you’d like to understand more about how GA4 works, how to get more out of the reports or make it more useful for you check out M Training’s 1 Day GA4 Training Courses
Or if you want someone else to do the set-up work for you, get in touch with us on 0161 226 6032 or email info@mtraining.co.uk
Author

Martin Woodfield is a Digital Marketing Trainer, running courses for M Training and various universities. He is a Fellow of the Chartered Institute of Marketing and has worked for some of the UKs leading companies. He has 20 years experience in digital marketing and has worked in senior marketing roles for over 30 years.
-

SEO Quiz 2025
10 Jan 2022Do you know your title tags from you meta descriptions? Test your knowledge with this SEO Quiz updated for 2025
Read More -
Should I switch to GA4?
28 Feb 2022If you are wondering whether you should switch to GA4 - read about the pros and cons here...
Read More -

Google Ads Checklist
10 Feb 2022Use this checklist to ensure that your Google Ads campaigns are correctly set up so you're not wasting budget.
Read More


")
")


